Translate

Tuesday, April 22, 2014

Mid 16th Century Italian Camica

Except for the final pleating on the neck and sleeve cuffs, I have finished the camica for Cecilia.

The white linen fabric is a fairly loose weave with a small square pattern woven in. It was necessary to finish all seams so all pieces were serged separately before seaming to reduce the fabric unraveling in the wash. The sleeves and neck have been hand-finished with a narrow hem.

The gussets were sewn to the upper sleeves first, then to the front and back of the camica. The front of the camica is set 5 inches lower than the back because of the design of the gown to be worn over it. The width of the camica is 45 inches before seams.

The underarm gussets are 8 inches square before seams. The front is set about 2 inches into the sleeve.
The cuffs will be knife pleated with a small frill with a thread loop and Mother-of-Pearl button closure. I left the bottom 3 inches open and hand-hemmed the opening to make a placket.
Cecilia has woven Altavia color trim (green, black and white) for me to use to stabilize the pleating on the cuffs and the neck.
Sometimes you have to satisfy the curiosity of the resident cat.

Wednesday, April 16, 2014

Custom Pillowcases

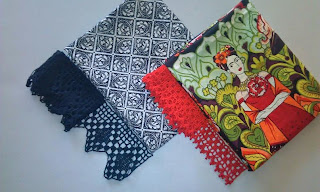
A while back I pinned a photo to my Knitting & Crocheting Pinterest board. The photos are of colorful pillowcases with equally colorful crocheted edging.

Fast forward to March in Seattle at Pacific Fabrics. I was trying to find the "just-right" birthday presents for my friends Melisande and Briana when I spied an Elizabethan-esque black and white pattern on a rounder. With a little bit of looking I found, on another rounder, this equally incredible Frieda fabric!

Cassandra has a vast selection of crochet thread and allowed me to rummage through to find the right colors to go with the fabrics. The edging patterns then needed to be selected. The black was an easy choice, something with a diamond pattern to coordinate with the fabric. The red, however, was more problematic. Cassandra and I tried to find a crochet border with skulls but our efforts were thwarted. Poo. In the end I decided to just crochet an edging that I liked, otherwise I would be forever searching and not making and finishing.

CUTTING AND SEWING INSTRUCTIONS

Purchase 1 yard of cotton or linen fabric that is 42 inches or more wide. Wash to remove sizing and pre-shrink the fabric. Measure, mark and cut the fabric 33 inches long X 41 inches wide. Fold fabric in half, right sides together, to make a 33 X 20.5 inch rectangle.

Start sewing at the folded edge using a stitch length of 2.5 with a 5/8 inch seam allowance. Sew along 20.5 inch edge, pivot at the corner with the needle in the down position and continue sewing along the 33 inch side to the end. Back-stitch at each end of stitching. Finish the inside of the seam allowance to prevent unraveling.

Turn pillowcase right-side-out. Turn raw edge, wrong side of fabric to wrong side of fabric, up 1 inch. Fold edge up one more time to form a 1 inch hem. Using a stitch length of 3.5 and stitching close to the inside folded edge, sew around the open end of the pillowcase, overlapping stitching by 1/2 inch.

If you want to add a crochet edge, whip stitch it to the open hemmed edge of the finished pillowcase (which I have yet to do).

I hope you like this simple DIY project and will consider making lots of colorful crochet-edge pillowcases for yourself, friends and family!

Wednesday, April 2, 2014

And sew, it begins.

Pictured here are just a few of the pieces of linen and cotton that will become garb. The white is destined for a camica, a leine, veils and a chemise. The solid light blue, red and black and the print red and gold will be transformed into Roman garb.
The first step is to serge the raw ends and wash to pre-shrink and to take out the sizing left from the manufacturing process.

Wait until I show you the rest of the 44 yards of linen for the outer garments...

Welcome to Flaxen Abbey!

I created this blog to post photos and instructions for the garb that is on the make-it list for Altavia Anniversary and Coronation. There are many pieces of several different types of garb from varied centuries and parts of the Medieval world. I just hope I can keep all of them straight and learn more about them in the process.

It is also my hope that this blog will serve as an outlet for all the members of Flaxen Abbey and to continue to encourage all of us to share our projects with the known world. Stay tuned.